Back to Safety Center Main Menu
Uploading a File
File Format
In order to use PeopleSync, a comma-separated values (CSV) file needs to be created. The format of this file should be the following:
[user email address],[group name]
Here is an example below of what the file should look like:

There should be no other information in this file. The file to be uploaded must have this format or the system will reject it.
Uploading a File
Approach 1: Through the Online Portal
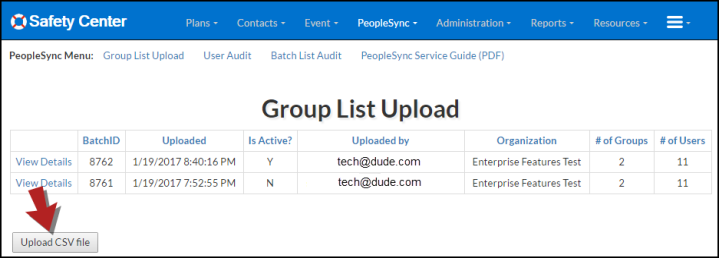
- Once the Data Administrator is logged into the Portal, click on the PeopleSync tab and then click on Group List Upload.
- Click the Upload CSV file button.

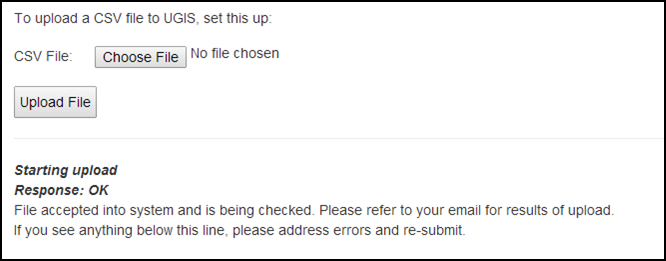
- Choose the file to upload and click Upload File.
- A status will be displayed after the import noting successful or rejected upload. If the upload is a success, you will see a file accepted message.
- You will receive an email once the CSV file was received into the system and whether the system has accepted the file or rejected it. If the system has accepted the file, you can proceed with assigning groups to plans. If the system has rejected the file, correct the errors and re-submit.

Approach 2: Automated Script
Users can write a script (using such tools as Powershell, Unix shell, Perl, etc.) to download the information needed to build the CSV file from their Active Directory, LDAP, or similar system. This enables easy automation and eliminates the need for this to be done manually.
PowerShell Script example
By utilizing the PowerShell command Get-ADUser, the user can build a file directly from their Active Directory. In order for the Safety Center portal to recognize the file, use the Get-ADUser command to pull email addresses and group names. Generally, this can be achieved by filtering the memberOf, mail (email address), and sn (surname) fields from Active Directory. Filtering by these fields ensures each of these fields have something in it. This helps eliminate the mailboxes that aren’t attached to particular users or are distribution groups. If there are a large number of people that need to be loaded into the file, it is recommended to filter either more in depth or by more fields to refine the PeopleSync lists. This is achieved in the first line of the script shown below.
In order to assure that each user in the list has the correct amount of groups, the second line of the script opens the CSV file that is created in the first line, replaces the extraneous quotations marks with a comma (to push each memberOf group into its own column) and save the CSV.
Here is an example of the PowerShell script:
Get-ADUser -Filter {(memberOf -like "*") -and (mail -like "*") -and (sn -like "*")} -Properties * | Select-Object -Property mail,@{l='MemberOf'; e= { ( $_.memberof | % { (Get-ADObject $_).Name }) -join '","' }} | Sort-Object -Property mail | export-csv [File Name] -NoTypeInformation
(Get-Content [File Name]) | % {$_ -replace '"",""', '","'} | Select-Object -Skip 1 | out-file -FilePath [File Name] -Force -Encoding ascii
cURL Script example
The user can then use tools that support HTTPS client interface (cURL, PowerShell, web browsers, etc.) to submit the CSV file into the portal as a multipart form POST request. The following fields are needed to submit via this method:
upload: The file that you are uploading, for example: @myfile.csv
mail: Email address of the authorized user(s)
pwd: Authorized user’s password
orgid: (optional) Organizational ID of the organization or sub-organization the user is uploading to.
response: (optional) If the user would like to save the results to a log file (using 2 right arrows and giving a file name), this will allow the user to get the results as HTML (the same that is sent via email) or as JSON.
URL: https://safetycenter.dudesolutions.com/myPlans/Wizard/AdminUGISupload.aspx
Here is an example of using cURL to upload the file to the portal:
curl -k -X POST -F "upload=@myfile.csv" -F "mail=user@domain" -F "pwd=********" -F "orgid=000" -F "response=JSON" https://safetycenter.dudesolutions.com/myPlans/Wizard/AdminUGISupload.aspx >> log.txt
